数据采集(下)
如何查看函数参数和方法介绍
- ctrl+鼠标左键点击函数
Selenium --- 过验证大杀器
pip install selenium
驱动安装-chrome
注意:若浏览器系统版本更新,需要更换chromedriver驱动
chrome浏览器输入
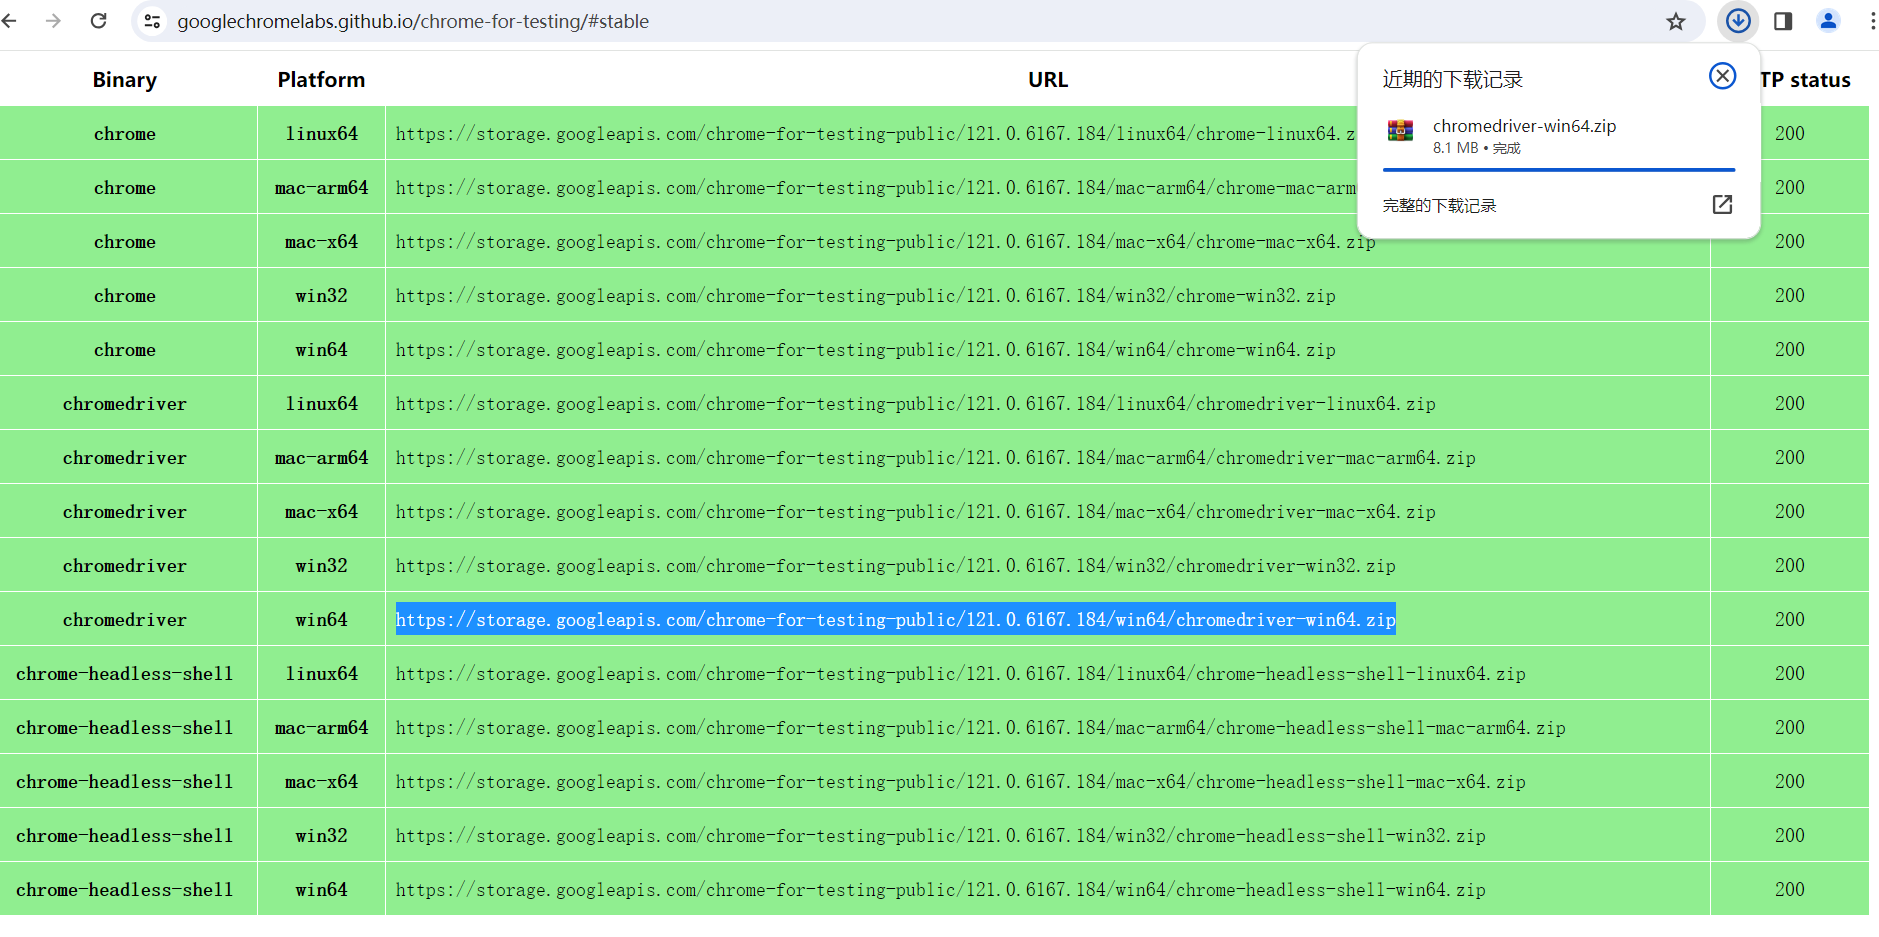
chrome://version/查看浏览器系统版本,驱动版本匹配优先最近的老版本进入Chrome for Testing 并选择stable(稳定版)
选择适合自己平台的chromedriver并复制链接进行下载解压并提取chromedriver文件(若仅有win32,则win32包含win64,下载即可)
- 法一:终端输入
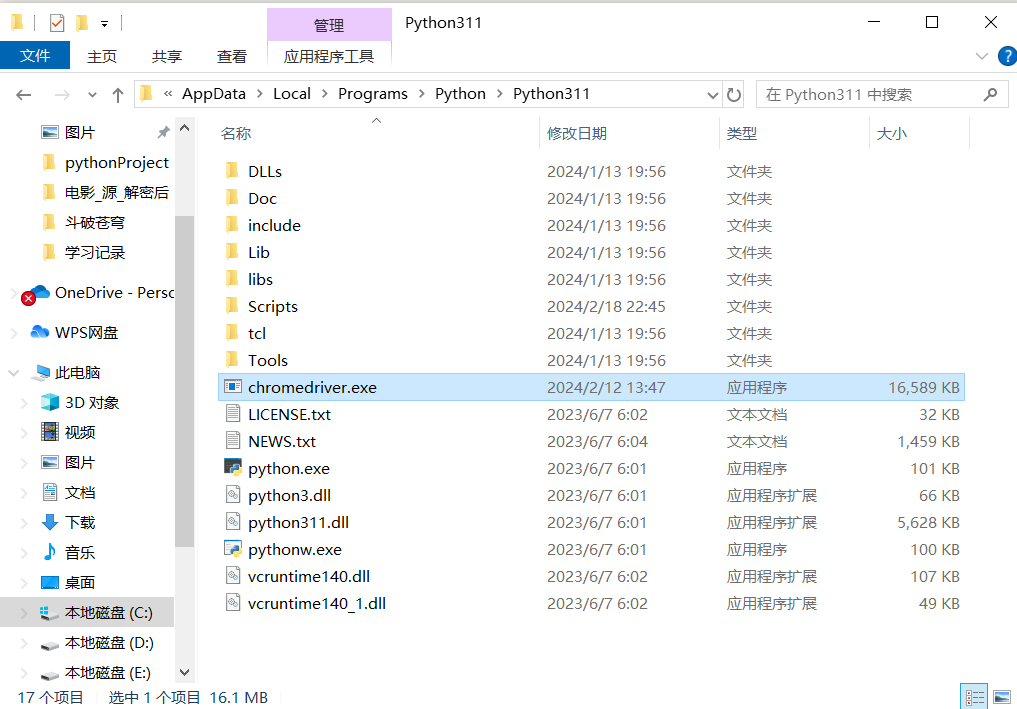
py -op查看python解释器路径,并把chromedriver移动到路径中
from selenium.webdriver import Chrome, Firefox, Ie, Safari, Edge

# 创建浏览器对象
web = Chrome()
url = "http://www.baidu.com"
web.get(url)- 法二:将chromedriver移动到工程中,并在代码中加入chromedriver路径
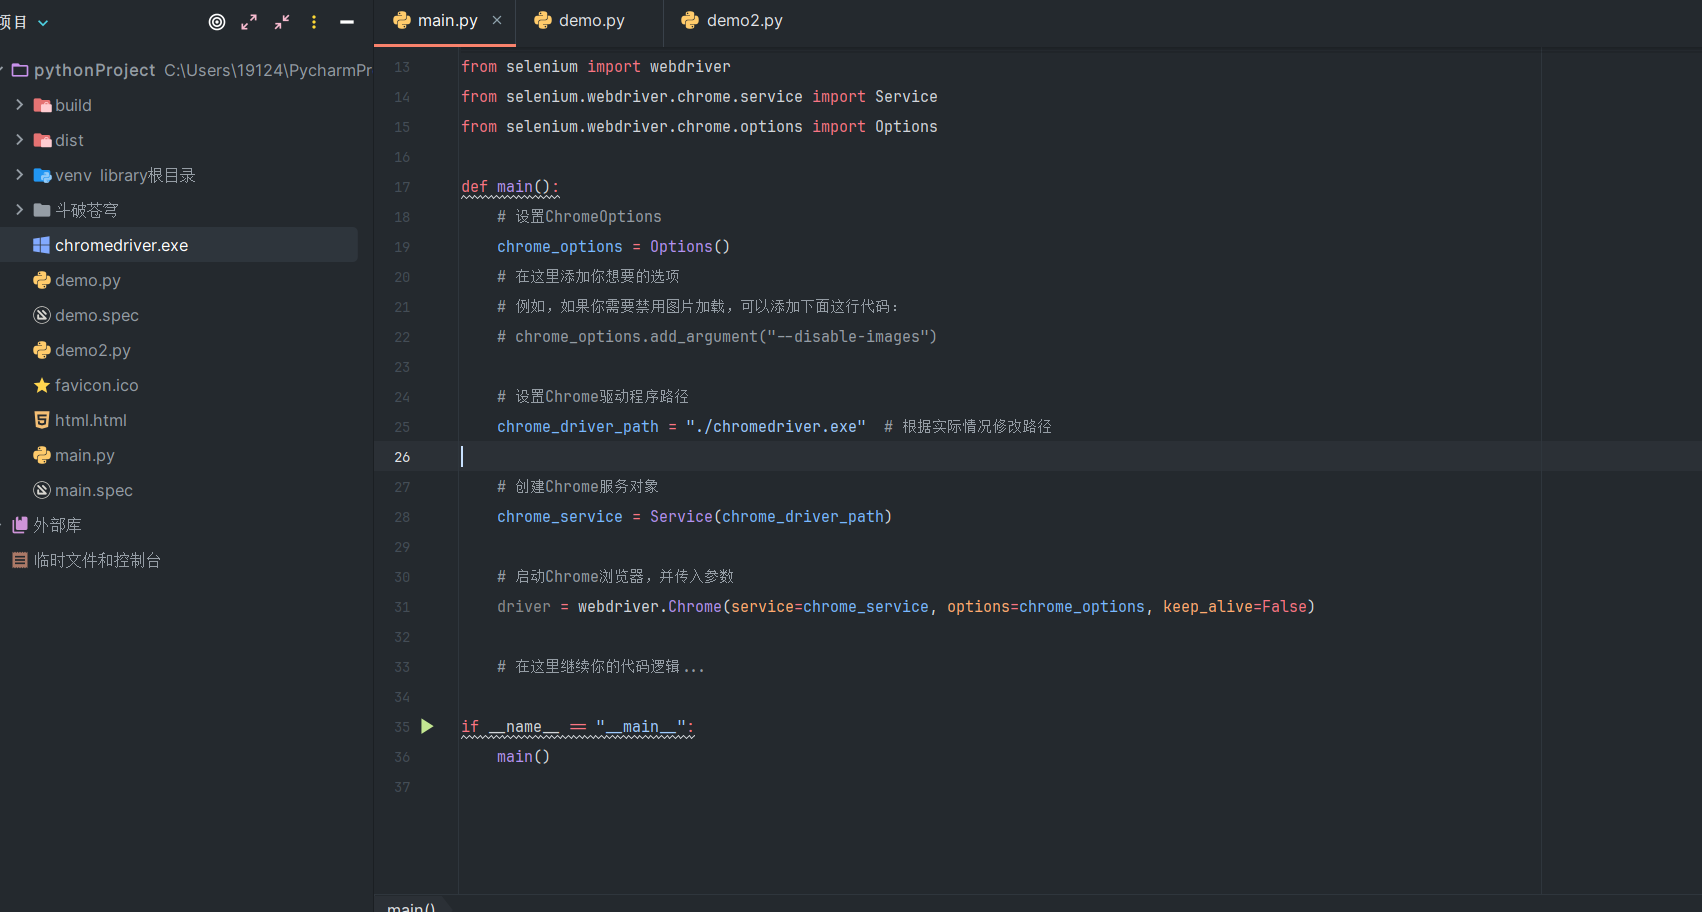
# 简易版本--速度最快--因为驱动路径查找优先
from selenium.webdriver import Chrome
from selenium.webdriver.chrome.service import Service

# 若需要无头浏览器,则解开以下两条代码
options = Options()
# options.add_argument('--headless')
# options.add_argument("--disable-gpu")

# 启动Chrome浏览器,并传入参数
web = Chrome(service=Service("./chromedriver.exe"), options=options)
web.implicitly_wait(10)

web.get("http://www.baidu.com")
导入selenium
from selenium.webdriver import Chrome, Firefox, Ie, Safari, Edge浏览器配置
设置驱动路径
from selenium.webdriver import Chrome
from selenium.webdriver.chrome.service import Service

# 设置Chrome驱动程序路径
chrome_service = Service("./chromedriver.exe")
# 启动Chrome浏览器,并传入驱动路径
web =Chrome(service=chrome_service)
SSL验证
options = Options()
options.add_argument("--allow-running-insecure-content")
options.add_argument("--ignore-certificate-errors")
无头浏览器
from selenium.webdriver import Chrome
from selenium.webdriver.chrome.service import Service

# 浏览器配置
options = Options()
# 无头浏览器
options.add_argument('--headless')
# 禁用gpu,GPU加速会让浏览器的性能更好,但是会增加一些特征点,从而被检测出来
options.add_argument("--disable-gpu")
web = Chrome(service=Service("./chromedriver.exe"), options=options)
防检测
防检测方法非万能,对于特定网站:“见人说人话,见鬼说鬼话”,分析网站检测方式,针对性解决
UA检测
UA过短---selenium默认的user-agent比较短,这就可能会让部分网站检测出我们使用了selenium,增加了这一特征点被检测出来的概率。我们可以修改user-agent来解决这个问题
options.add_argument('--headless')
user_agent = 'Mozilla/5.0 (Windows NT 10.0; Win64; x64) AppleWebKit/537.36 (KHTML, like Gecko) Chrome/110.0.0.0 S```afari/537.36'
options.add_argument(f'user-agent={user_agent}')
浏览器分辨率检测
selenium无头模式下的浏览器分辨率默认是800*600,这个分辨率太小了,很容易被检测出来,我们可以设置一个大一点的分辨率来解决这个问题
options.add_argument('--headless')
# 参数设置分辨率
options.add_argument("--window-size=1920,1080")

web = Chrome(options=options)
# 浏览器大小分辨率
browser.set_window_size(1920, 1080)
GPU加速
selenium无头模式下的浏览器默认是开启GPU加速的,我们可以禁用GPU加速来解决这个问题,GPU加速会让浏览器的性能更好,但是会增加一些特征点,从而被检测出来
options.add_argument('--headless')
options.add_argument("--disable-gpu")
JS检测webdriver
有些网站会通过js来检测是否使用了selenium,在启用selenium后js读取window.navigator.webdriver参数返回值为true,这样就可以检测出我们使用了selenium。我们可以通过关闭浏览器上部提示语来修改js特征
# 88版本以前
web.execute_cdp_cmd("Page.addScriptToEvaluateOnNewDocument", {
  "source": """
    Object.defineProperty(navigator, 'webdriver', {
      get: () => undefined
    })
  """
})

# 88版本以后
options = Options()
options.add_argument("--disable-blink-features=AutomationControlled")
其他配置
常用配置
# 无头浏览器
options.add_argument('--headless')
# 禁用gpu,GPU加速会让浏览器的性能更好,但是会增加一些特征点,从而被检测出来
options.add_argument("--disable-gpu")
# 配置对象添加替换User-Agent的命令
options.add_argument('--user-agent=Mozilla/5.0 HAHA')
# 设置浏览器分辨率(窗口大小)
options.add_argument('--window-size=1366,768')
# 最大化运行(全屏窗口),不设置,取元素会报错
options.add_argument('--start-maximized')
# 禁用浏览器正在被自动化程序控制的提示
options.add_argument('--disable-infobars')
# 隐身模式(无痕模式)
options.add_argument('--incognito')
# 禁用javascript
options.add_argument('--disable-javascript')
全部配置
List of Chromium Command Line Switches « Peter Beverloo
基本操作
创建浏览器实例化对象
web = Chrome() # 如果驱动在工程中,要在括号加上路径打开网址
url = "https://www.lagou.com/wn/"
web.get(url)
页面截图到路径
web.find_element(By.XPATH, '//form/div/img').screenshot("文件名.jpg")	# 保存到文件中
png = web.find_element(By.XPATH, '//form/div/img').screenshot_as_png()	# 保存到文件,返回值为字节
base64 = web.find_element(By.XPATH, '//form/div/img').screenshot_as_base64()	# 图片转化为base64编码返回字符串
关闭窗口
web.close()退出整个浏览器
web.quit()获取cookies
爬虫学习记录(下)->笔记本->selenium获取cookies
定位、操作、提取
定位
from selenium.webdriver.common.by import By

web.find_element(By.方法名, 定位字符串)		# element不加s是获取第一个节点
web.find_elements(By.方法名, 定位字符串) # elements是获取一组符合条件的节点- 八种方法-----element + s即为获取一组符合条件的节点
| 函数 | 阐释 | 例子 |
|---|---|---|
| By.ID | 根据id属性值定位 | web.find_element(By.ID, "id属性值") |
| By.XPATH | 根据xpath语句定位 | web.find_element(By.XPATH, "xpath语句") |
| By.TAG_NAME | 根据标签名定位 | web.find_element(By.TAG_NAME, "标签名") |
| By.LINK_TEXT | 根据超链接文本定位 | web.find_element(By.LINK_TEXT, "字符串") |
| By.PARTIAL_LINK_TEXT | 根据超链接文本定位 | web.find_element(By.PARTIAL_LINK_TEXT, "部分超链接文本") |
| By.NAME | 根据name属性值定位 | web.find_element(By.NAME, "name属性值") |
| By.CLASS_NAME | 根据class属性值定位 | web.find_element(By.CLASS_NAME, "class属性值") |
| By.CSS_SELECTOR | 根据css选择器值定位 | web.find_element(By.CSS_SELECTOR, "css选择器语句") |
操作
- 输入和点击
| 函数 | 阐释 | 例子 |
|---|---|---|
| .send_keys("字符串") | 输入文字 | web.find_element(By.ID, "search_input").send_keys("爬虫", "JAVA") |
| .send_keys("Keys.按键") | 输入按键【详情查看函数方法】 | web.find_element(By.ID, "search_input").send_keys("Keys.ENTER") |
| .click() | 点击 | web.find_element(By.ID, "search_button").click() |
拖动和滑动
from selenium.webdriver import Chrome, ActionChains     # 事件链
# 拖拽
ActionChains(web).drag_and_drop_by_offset(节点, xoffset=偏移坐标X, yoffset=偏移坐标Y).perform()
# 点击抓住-拖动
ActionChains(web).click_and_hold(节点).move_by_offset(xoffset=偏移坐标X, yoffset=偏移坐标Y).perform()
# 休眠
ActionChains(web).pause(random.uniform(0.0001, 0.0003)) # 事件休眠
提取节点数据
| 函数 | 阐释 | 例子 |
|---|---|---|
| .text | 提取text值 | print(web.find_element(By.XPATH, '//*[@id="job_detail"]/dd[2]/div').text) |
| .get_property('属性名') | 提取属性值 | print(web.find_element(By.XPATH, '//*[@id="job_detail"]/dd[2]/div').get_property('href')) |
下拉列表的选择
导包
from selenium.webdriver.support.select import Select定位下拉列表
sel_new = Select(web.find_element(By.XPATH, '//*[@id="OptionDate"]'))切换选项
| 函数 | 阐释 | 例子 |
|---|---|---|
| .select_by_index(索引值) | 通过索引位置切换 | sel_new.select_by_index(5) |
| .select_by_value('指定value值') | 通过value值切换 | sel_new.select_by_value('河南') |
| .select_by_visible_text('指定可见文字') | 通过可见文字切换 | sel_new.select_by_visible_text('河南省') |
示例
from selenium.webdriver import Chrome
from selenium.webdriver.chrome.service import Service
from selenium.webdriver.chrome.options import Options
from selenium.webdriver.common.by import By
from selenium.webdriver.support.select import Select
import time

# 配置无头浏览器
options = Options()
# options.add_argument("--headless")
# options.add_argument("--disable-gpu")
options.add_argument("--window-size=1920,1080")

# 启动Chrome浏览器,并传入参数
web = Chrome(service=Service("./chromedriver.exe"), options=options)
web.set_window_size(1920, 1080)

web.get("https://www.endata.com.cn/BoxOffice/BO/Day/index.html")
time.sleep(5)

# 定位到select
sel_new = Select(web.find_element(By.XPATH, '//*[@id="OptionDate"]'))

print(len(sel_new.options))  # 所有的选项

for i in range(len(sel_new.options)):
    sel_new.select_by_index(i)
    time.sleep(3)
    tr_list = web.find_elements(By.XPATH, '//*[@id="TableList"]/table/tbody/tr')
    for tr in tr_list:
        print(tr.find_element(By.XPATH, './td[2]/a/p').text)

time.sleep(2000)
获取页面信息
| 函数 | 阐释 | 例子 |
|---|---|---|
| web.title | 获取网站的title | print(web.title) |
| web.page_source | 获取页面代码【已经通过script脚本更新过】 | print(web.page_source) |
| web.getcookie("cookie字典中的指定键") | 获取指定cookie值 | print(web.get_cookies("cookie字典中的指定键")) |
| web.get_cookies() | 获取cookie字典-所有cookies | print(web.get_cookies()) |
| web.current_url | 获取当前url地址 | print(web.current_url) |
切换驱动器视角
切换窗口
切换到第一个窗口
web.switch_to.window(web.window_handles[0])切换到最后一个窗口
web.switch_to.window(web.window_handles[-1])
切换框架【页面内嵌套ifame---登录】
切入指定iframe
iframe = web.find_element(By.XPATH, '//*[@id="kw"]')
web.switch_to.frame(iframe)
切出iframe到其父框架
web.switch_to.parent_frame()
等待处理
time等待
time.sleep(10) # 等10s,无论加不加载出来隐式等待--最多等x秒--一次设置,全局使用
web.implicitly_wait(10) # 最多等待时间显式等待--要等待的节点--多次设置
webDriveWait(,10,0.5)	# 最多等待时间,查找频率

from selenium.webdriver.support.ui import WebDriverWait     # 第三种等待方法
from selenium.webdriver.support import expected_conditions as EC    # 等待出现的对象
el = WebDriverWait(web, 10, 0.5).until(
    EC.presence_of_element_located((By.XPATH, 'xpath语句'))
)
DrissionPage
安装
pip install DrissionPage	# 安装
pip install DrissionPage --upgrade	# 升级到稳定版
导入
from DrissionPage import ChromiumPage	# 浏览器模式
from DrissionPage import SessionPage	# 数据包模式
from DrissionPage import WebPage		# 全部都有

from DrissionPage import ChromiumOptions	# 浏览器对象启动参数
from DrissionPage import SessionOptions		# session对象启动参数
from DrissionPage.common import Settings	# 全局配置,找不到元素抛出异常

from DrissionPage.common import Keys	# 按键
from DrissionPage.common import Actions	# 动作链【浏览器对象已经内置】
from DrissionPage.common import By		# 与selenium一致

from DrissionPage.common import wait_until			# 等待传入方法结果为真
from DrissionPage.common import make_session_ele	# 从 html 文本生成ChromiumElement对象
from DrissionPage.common import configs_to_here		# 把配置文件复制到当前路径
from DrissionPage.common import get_blob			# 获取指定的blob资源
操作
# 等待页面加载
page.wait.load_start()
接码平台
自建代理
docker pull sameersbn/squid # 1.拉取squid镜像
标准配置
vim squid/squid.conf	# 2.squid.conf配置
==============================
acl all src 0.0.0.0/0.0.0.0
acl SSL_ports port 443
acl Safe_ports port 80 # http
acl Safe_ports port 443 # https
acl CONNECT method CONNECT
http_access allow all
http_port {port}
visible_hostname proxy
==============================
# 3.启动容器[挂载squid.conf]
sudo docker run \
-d \
--name squid \
-p 3128:3128 \
-v /home/spa/squid/squid.conf:/etc/squid/squid.conf \
sameersbn/squid# 4.测试
export http_proxy=http://{代理IP}:3128
wget http://www.baidu.com账号密码配置
# 1.安装软件包并生成账号密码文件[公网服务器上]
sudo apt install apache2-utils
sudo htpasswd -c .squid_users {account_name}	# 然后输入account_password
# 2.squid.conf配置
vim squid/pass_squid.conf
=================================================================================
acl localnet src 0.0.0.1-0.255.255.255 # RFC 1122 "this" network (LAN)
acl localnet src 10.0.0.0/8 # RFC 1918 local private network (LAN)
acl localnet src 100.64.0.0/10 # RFC 6598 shared address space (CGN)
acl localnet src 169.254.0.0/16 # RFC 3927 link-local (directly plugged) machines
acl localnet src 172.16.0.0/12 # RFC 1918 local private network (LAN)
acl localnet src 192.168.0.0/16 # RFC 1918 local private network (LAN)
acl localnet src fc00::/7 # RFC 4193 local private network range
acl localnet src fe80::/10 # RFC 4291 link-local (directly plugged) machines
acl SSL_ports port 443
acl Safe_ports port 80 # http
acl Safe_ports port 21 # ftp
acl Safe_ports port 443 # https
acl Safe_ports port 70 # gopher
acl Safe_ports port 210 # wais
acl Safe_ports port 1025-65535 # unregistered ports
acl Safe_ports port 280 # http-mgmt
acl Safe_ports port 488 # gss-http
acl Safe_ports port 591 # filemaker
acl Safe_ports port 777 # multiling http
acl CONNECT method CONNECT
# username&password auth config
auth_param basic program /usr/lib/squid/basic_ncsa_auth /etc/squid/squid_passwd
acl ncsa_users proxy_auth REQUIRED
http_access allow ncsa_users
http_access deny !Safe_ports
http_access deny CONNECT !SSL_ports
http_access allow localhost manager
http_access deny manager
http_access deny to_localhost
http_access allow localnet
http_access allow localhost
http_access deny all
http_port 3128
refresh_pattern ^ftp: 1440 20% 10080
refresh_pattern ^gopher: 1440 0% 1440
refresh_pattern -i (/cgi-bin/|\?) 0 0% 0
refresh_pattern (Release|Packages(.gz)*)$ 0 20% 2880
refresh_pattern . 0 20% 4320
=================================================================================# 3.启动容器[挂载squid.conf、squid_passwd]
docker run \
-d \
--name squid \
-p 3128:3128 \
-v /home/spa/squid/pass_squid.conf:/etc/squid/squid.conf \
-v /home/spa/squid/.squid_users:/etc/squid/.squid_users \
sameersbn/squid# 4.测试
export http_proxy=http://{account_name}:{account_password}@{代理IP}:{3128}
wget http://www.baidu.com实际使用
自定义:
- 端口及防火墙开放此端口
- 账号密码
字体反爬
字体格式
- TureTpe(.ttf)格式
Windows和Mac的最常见的字体,是一种RAW格式,因此他不为网站优化
- 支持的浏览器:IE9+、Firefox3.5+、Chrome4+、Safari3+、Opera10+、iOS Mobile Safari4.2+
- OpenType(.otf)格式
原始的字体格式,内置在TureType的基础上,提供更多的功能
- 支持的浏览器:Firefox3.5+、Chrome4.0+、Safari3.1+、Opera10.0+、iOS Mobile Safari4.2+
- Web Open Font Format(.woff)格式
Web字体中最佳格式,兼容性最好,开放的TrueType/OpenType的压缩版本,支持元数据包的分离
- 支持的浏览器:IE9+、Firefox3.5+、Chrome6+、Safari3.6+、Opera11.1+
- Embedded Open Type(.eot)格式
IE专用字体,可从TrueType创建此格式字体
- 支持的浏览器:IE4+
- SVG(.svg)格式
基于SVG字体渲染的一种格式
- 支持的浏览器:Chrome4+、Safari3.1+、Opera10.0+、iOS Mobile Safari3.2+
字体渲染
通过css的@font-face属性进行渲染
@font-face {
     font-family: <YourWebFontName>;
     src: <source> [<format>][,<source> [<format>]]*;
     [font-weight: <weight>];
     [font-style: <style>];
 }
/*
    YourWebFontName:自定义的字体名称,将被引用到你的Web元素中的font-family。如“font-family:“YourWebFontName”;”
    source:自定义的字体的存放路径,可以是相对路径也可以是绝路径;
   	format:自定义的字体的格式,主要用来帮助浏览器识别,其值主要有以下几种类型:truetype,opentype,truetype-aat,embedded-opentype,avg等;
    weight:定义字体是否为粗体
	style:定义字体样式,如斜体。
    [ ]:代表参数可不填。
*/
字体文件操作软件
- Windows:FontCreator
- macOS:IconFronPreview
- Linux:FontForge
解密流程
- 下载woff文件
- 使用
FontCreator查看密文的unicode值与woff中特定值(如:name)的对应关系 - 映射关系
- 进制等线性关系-->算法得出映射关系字典
- 汉字等难以查看线性关系
- 使用fontTools将woff文件特定值对应的字形转为jpg图片
- OCR识别图片并构建映射关系字典
- 加密文本解密
验证方法
点选验证
使用事件链
from selenium.webdriver import Chrome, ActionChains     # 事件链

for p in 验证返回值:		# 验证返回值示例:12,05|256,895
    x = p.split(',')[0]
    y = p.split(',')[1]
    ActionChains(web).move_to_element_with_offset(verify, xoffset=x, yoffset=y).click().perform()    # perform():提交事件
    time.sleep(1)
from selenium.webdriver import Chrome, ActionChains # 事件链
# 使用图鉴打码平台做演示
def base64_api(img, typeid, uname='图鉴用户名', pwd='图鉴密码'):
data = {"username": uname, "password": pwd, "image": img, "typeid": typeid}
result = requests.post("http://api.ttshitu.com/predict", json=data).json()
if result['success']:
return result["data"]["result"]
else:
# !!!!!!!注意:返回 人工不足等 错误情况 请加逻辑处理防止脚本卡死 继续重新 识别
return result["message"]
verify = web.find_element(By.XPATH, '/html/body/div[5]/div[2]/div[6]') # 点选验证图片的全部框
# verify.screenshot('123.png')
# print(base64_api(verify.screenshot_as_base64, 27))
for p in base64_api(verify.screenshot_as_base64, 27).split('|'):
x = p.split(',')[0]
y = p.split(',')[1]
ActionChains(web).move_to_element_with_offset(verify, xoffset=x, yoffset=y).click().perform() # perform():提交事件
time.sleep(1)笔记本
selenium获取cookies
cookies中有许多cookie,通过web.get_cookies()即可获取由许多cookie字典组成的一个cookies列表,然后经过拆分重组为需要的cookies。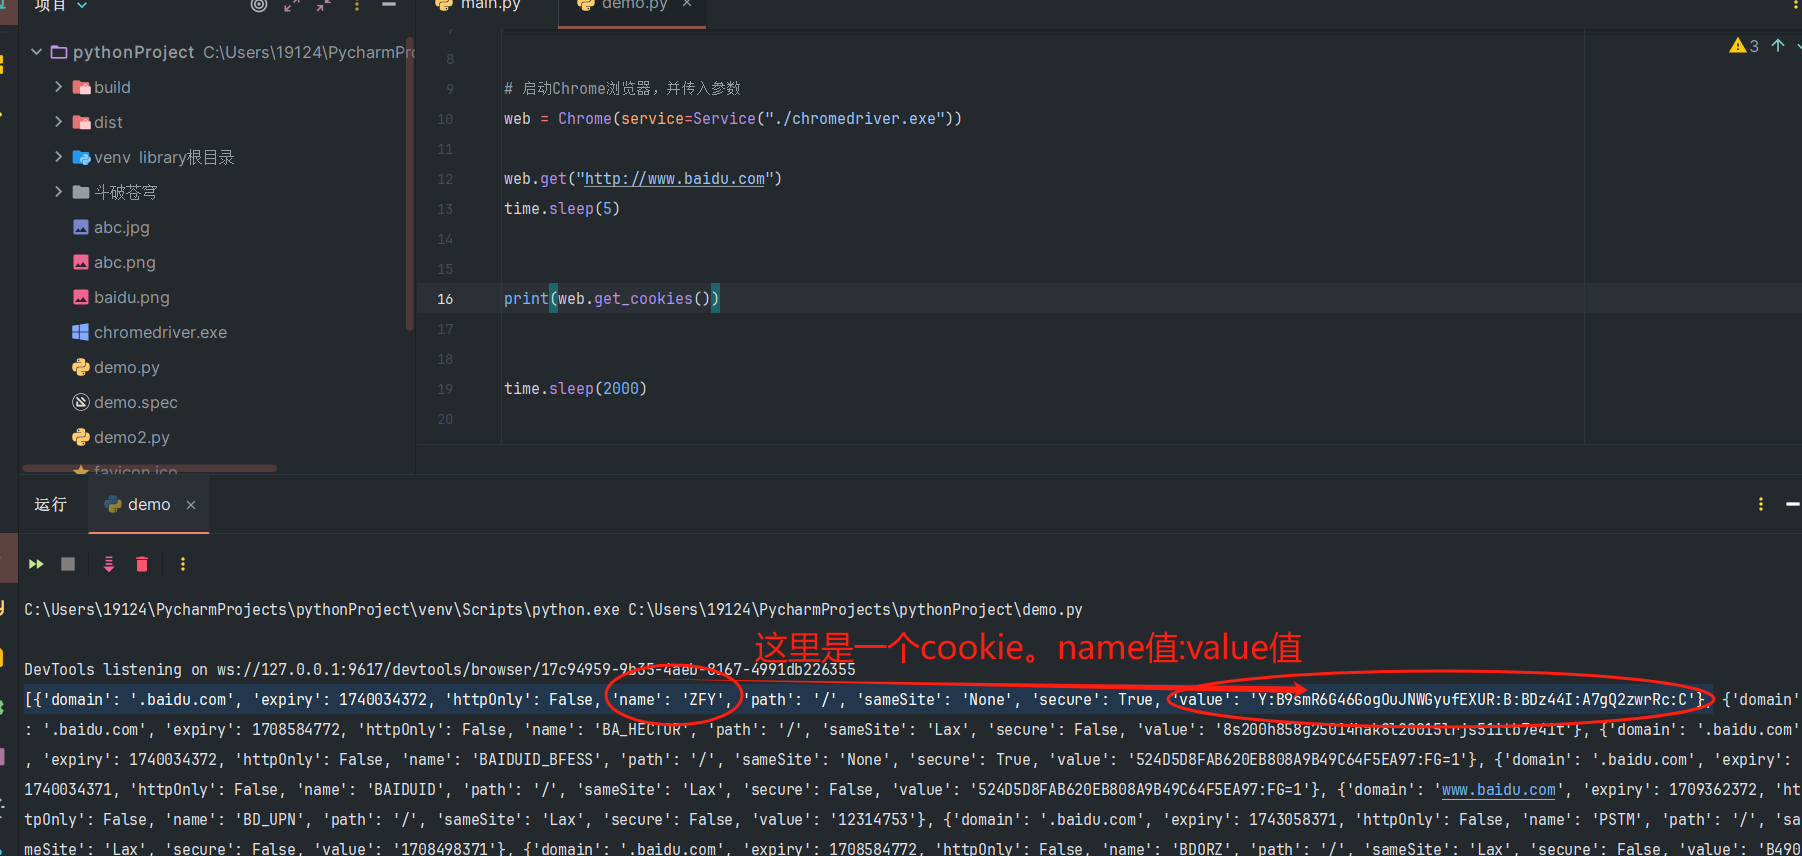
from selenium.webdriver import Chrome
from selenium.webdriver.chrome.service import Service
from rich import print
import requests
import time


def get_cookies(delay, url):
    # 启动Chrome浏览器,并传入参数
    web = Chrome(service=Service("./chromedriver.exe"))

    web.get(url)
    time.sleep(delay)
    cookies = {}
    for cookie in web.get_cookies():
        cookies[cookie['name']] = cookie['value']

    return cookies


delay = 5  # 看网络性能填写,网越快,值越低
url = "http://www.baidu.com"
url1 = "想拿着cookies访问的链接"

resp = requests.get(url=url1, cookies=get_cookies(delay, url))
print(resp.text)
selenium执行js代码
web.execute_script("""
    var a = document.getElementsByClassName("un-login-banner")[0];
    a.parentNode.removeChild(a);
""")
selenium12306登录cookies
import requests
from selenium.webdriver import Chrome
from selenium.webdriver.chrome.service import Service
from selenium.webdriver.chrome.options import Options
from selenium.webdriver.common.by import By
import time
from rich import print
from rich.prompt import Prompt


username = '用户名'
password = '密码'
id_card_4 = '身份证后六位'

options = Options()
options.add_argument("--disable-blink-features=AutomationControlled")
options.add_experimental_option('detach', True)
options.add_argument('--start-maximized')

web = Chrome(service=Service('./chromedriver.exe'), options=options)
web.implicitly_wait(10)
web.get('https://kyfw.12306.cn/otn/resources/login.html')

web.find_element(By.XPATH, '//*[@id="toolbar_Div"]/div[2]/div[2]/ul/li[1]/a').click()
time.sleep(1)
web.find_element(By.XPATH, '//*[@id="J-userName"]').send_keys(username)
web.find_element(By.XPATH, '//*[@id="J-password"]').send_keys(password)


web.find_element(By.XPATH, '//*[@id="J-login"]').click()

web.find_element(By.XPATH, '//*[@id="id_card"]').send_keys(id_card_4)
web.find_element(By.XPATH, '//*[@id="verification_code"]').click()  # 获取验证码按钮
web.find_element(By.XPATH, '//*[@id="code"]').send_keys(Prompt.ask("请输入你的手机验证码"))
web.find_element(By.XPATH, '//*[@id="sureClick"]').click()
print(web.get_cookies())

time.sleep(2000)
细节
重定向
特征
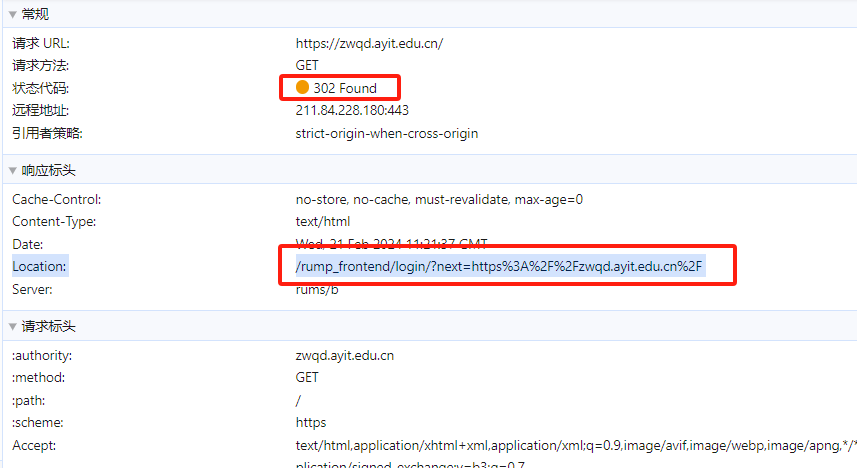
- 状态码为302
- 响应头的location中含有新定向地址
如何处理
- 定向方面:使用session可无视定向
- 多层加密(如boss直聘):使用selenium直接无视(减慢速度),只是速度慢。
网站也有针对selenium的检测,若登陆账号可减免部分检测(有可能被封号)
版权所有
版权归属:HuiXiaHeYu